


Overview
Learn about annotation queues, and how to assign items for team members to annotate
Overview
Confident AI allows internal, domain experts to leave annotations on traces, spans, and threads in addition to automatic ingestion of user feedback via the Evals API.
You can either leave annotations as an:
- Ad-hoc standealone task, or
- As part of an annotation queue
Both of the two workflow gives you the same end-result.
Coordinating human review at scale?Keep annotation work organized as reviewers, queues, and datasets growBook a demoAnnotate as a Standalone Task
Leaving annotations as a standealone task is extremely simple and only requires you to navigate to either the the Traces, Spans, or Threads page under the Observatory.
Each and every single trace/span/thread you click on will give you the ability to leave scores in the form of:
- A thumbs up/down, or
- A 1-5 star rating
You'll also have the opportunity to leave optional fields such as:
- Explanation
- Expected output (traces and spans)
- Expected outcome (threads)
To understand the difference in traces/spans and thread annotations, read this section on single vs multi-turn annotations.
Using Annotation Queues
An often preferred way, especially for larger teams that require annotations from domain experts, is to use annotation queues for annotation.
There are three types of annotation queues in Confident AI: Traces, Spans, and Threads. This mean that you cannot add threads to an annotation queue that are meant for traces, and vice-versa.
Create annotation queue
First create an annotation queue. In this entire example, we'll be showing an annotation queue for traces, but it will be almost identical for spans and threads.
Create Annotation Queue Add items to queue
You can add traces, spans, and threads to an annotation queue literally whenever you see one of them on the platform. This mainly includes the Observatory for Traces, Spans, and Threads, but also component-level testing reports where traces and spans are displayed.
You can add to multiple queues at once, and even assign a team member to annotate the items you're queueing. Anyone you assign — at queue time or later from Queue Settings — gets an in-app notification and an email summarizing what's been routed to them.
Add Traces to Queues Annotate queued items
After you've added items into your annotation queue, they will be visible in your annotation queue for annotation:
Annotate Queued Traces You'll have the option to:
- Track completion progress
- Filter for items that are completed, still in progress, or assigned to you
- Auto-mark items as completed when done with annotation
- View full details of traces/spans/threads
By default, the Queue Annotator strips away all information that except the input, output, metadata, and turns (for threads).
Track progress
Once you're done, go to Queue Settings to see an overview of all completed/in progress items.
Manage Queued Items
For items that you've queued for annotation, you can always manage them via the Queue Settings page, which includes assigning/unnassigning users, marking items as completed/in progress, and removing items from a queue.
Export as CSV
From the Queue Settings → Queued Items toolbar, click Export as CSV to download the queue's items and their annotations.
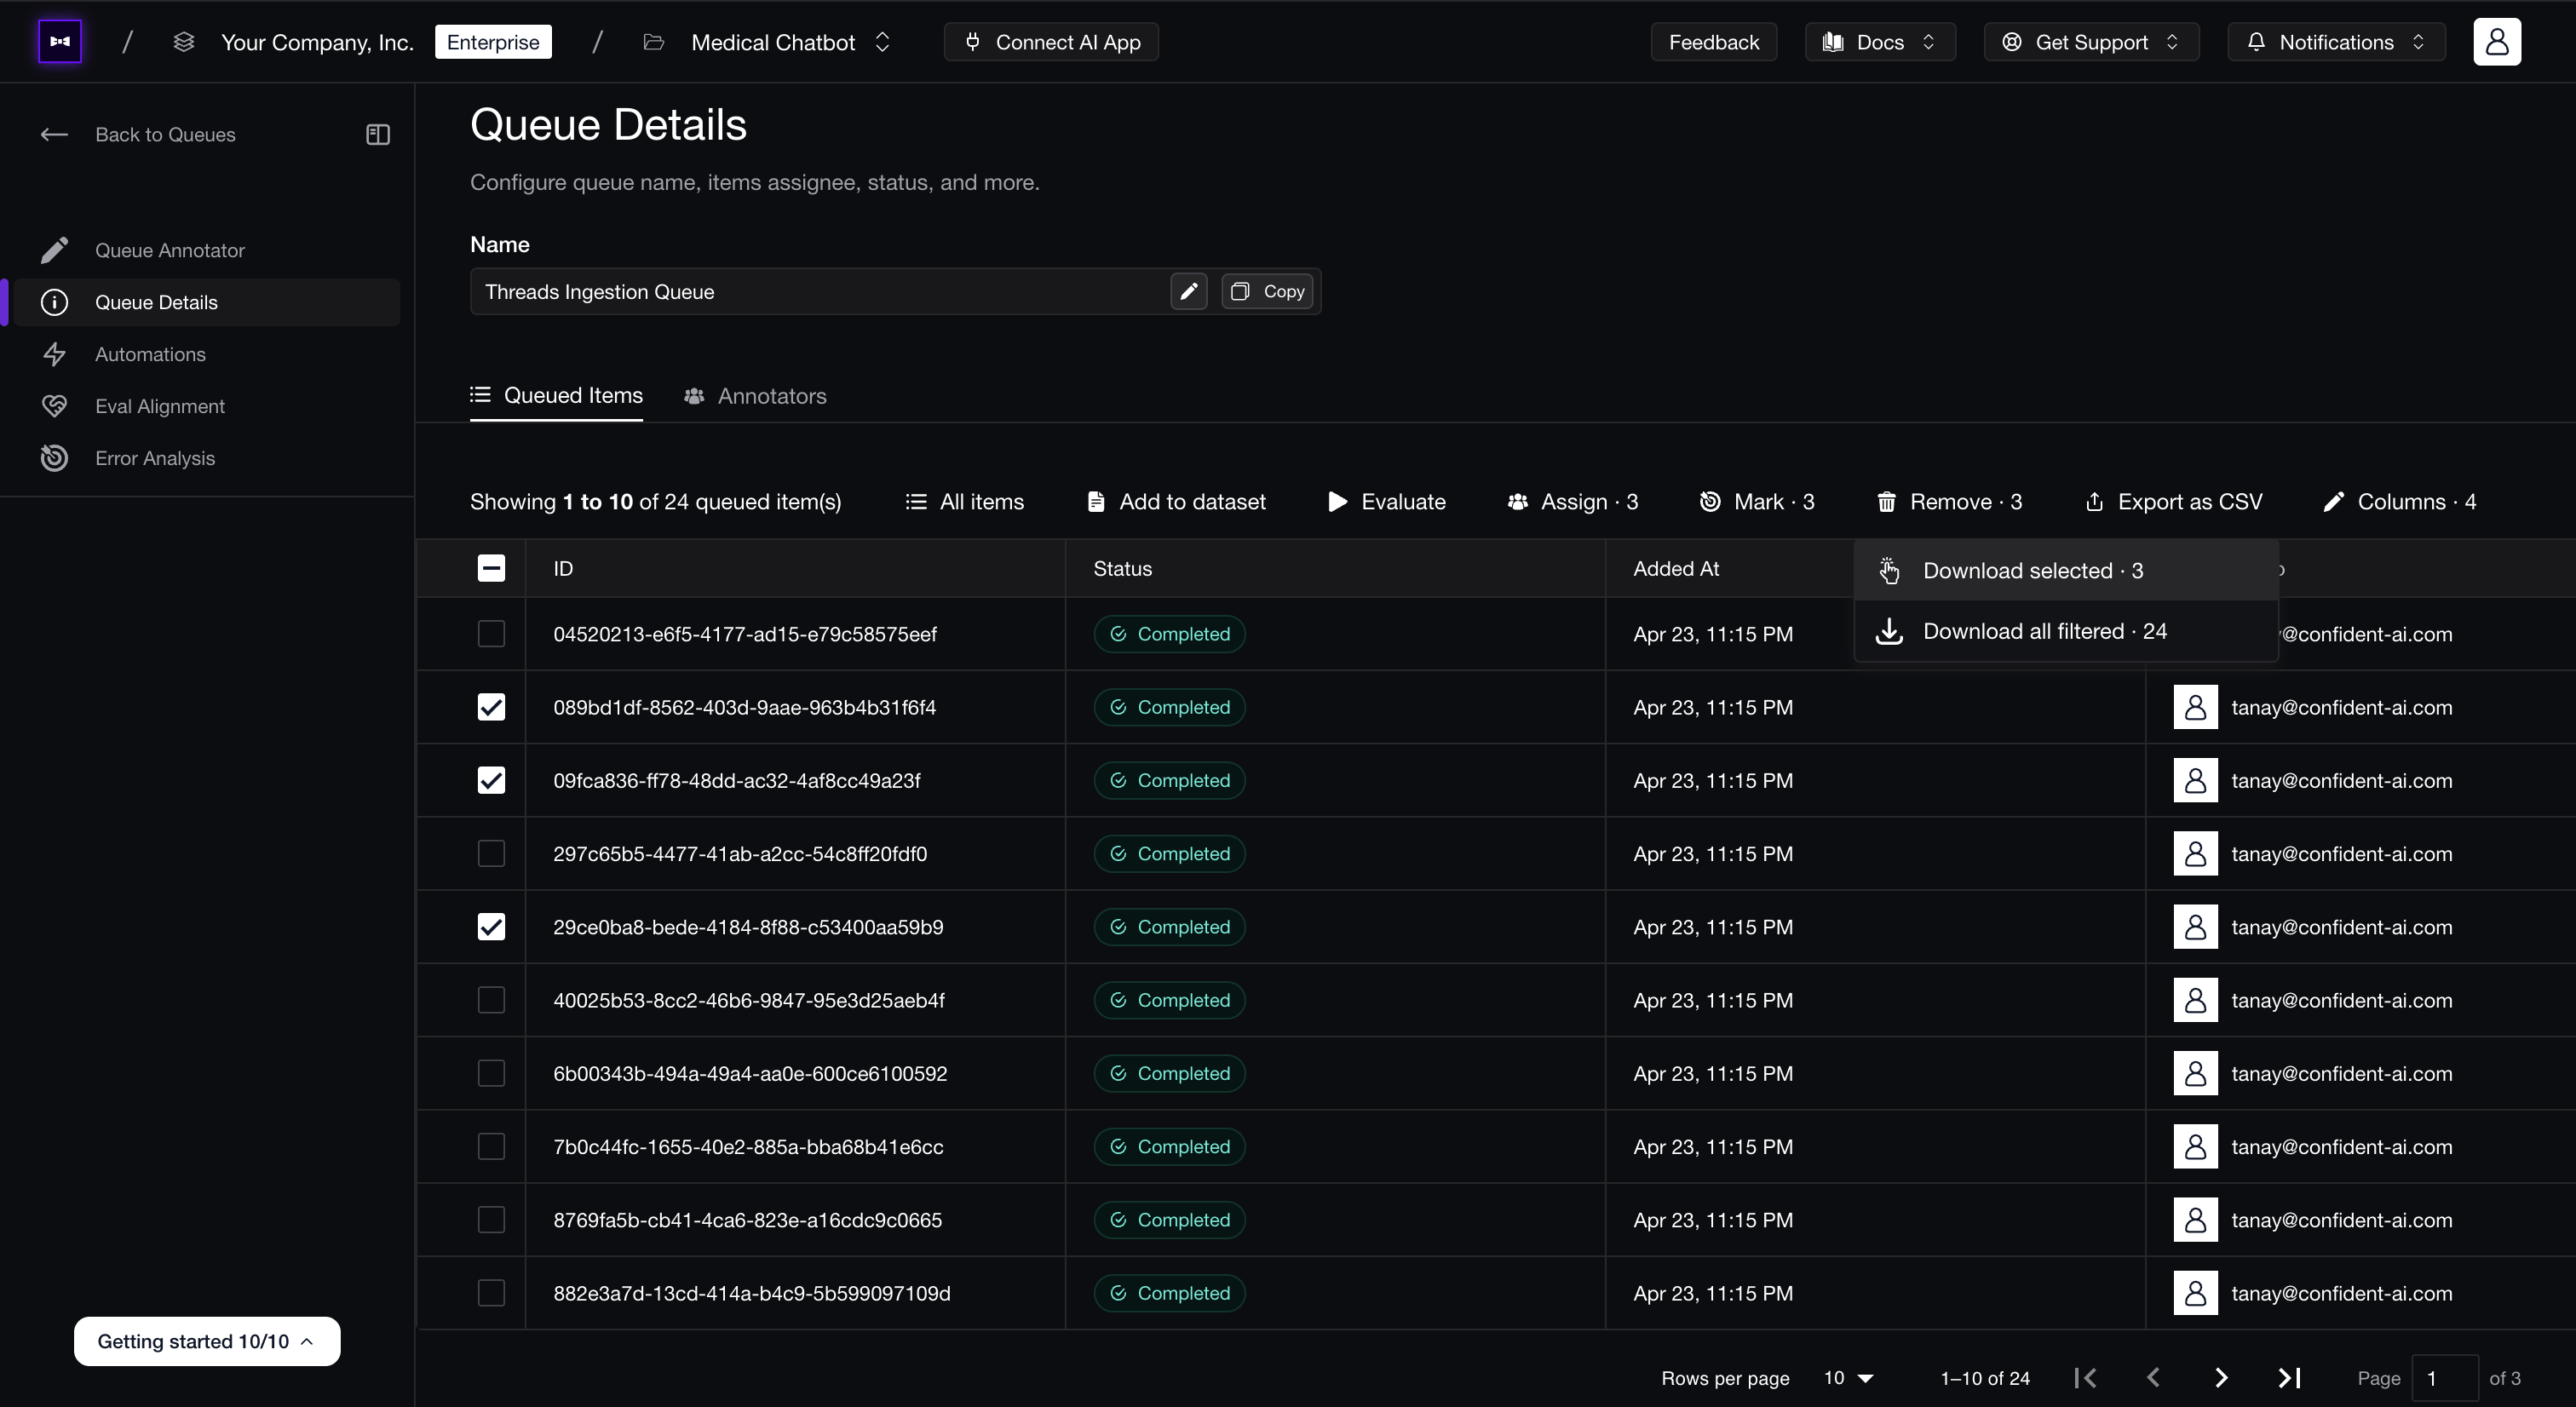
The dropdown offers two options:
- Download selected — only the rows you've checked. Selections persist across pages, so you can curate a precise subset before exporting.
- Download all filtered — every row that matches your current filters (status filter, sort, etc.), even rows you haven't paginated to yet.
The CSV emits one row per (queue item × annotation). Items without any annotations still appear, so the export reflects the full state of the queue regardless of completion.
| Column type | Columns |
|---|---|
| Lookup keys | queueItemId, entityType, entityId |
| Queue lifecycle | completed, assignedToEmail, addedAt |
| Annotation fields | annotationId, annotationName, annotationType, annotationRating, annotationExplanation, expectedOutput, expectedOutcome, annotatedBy, annotatedAt |
Auto-Ingestion
For ongoing review work, you can configure ingestion tasks that automatically pull matching data into a queue as it's produced — no manual "Add to queue" step required.
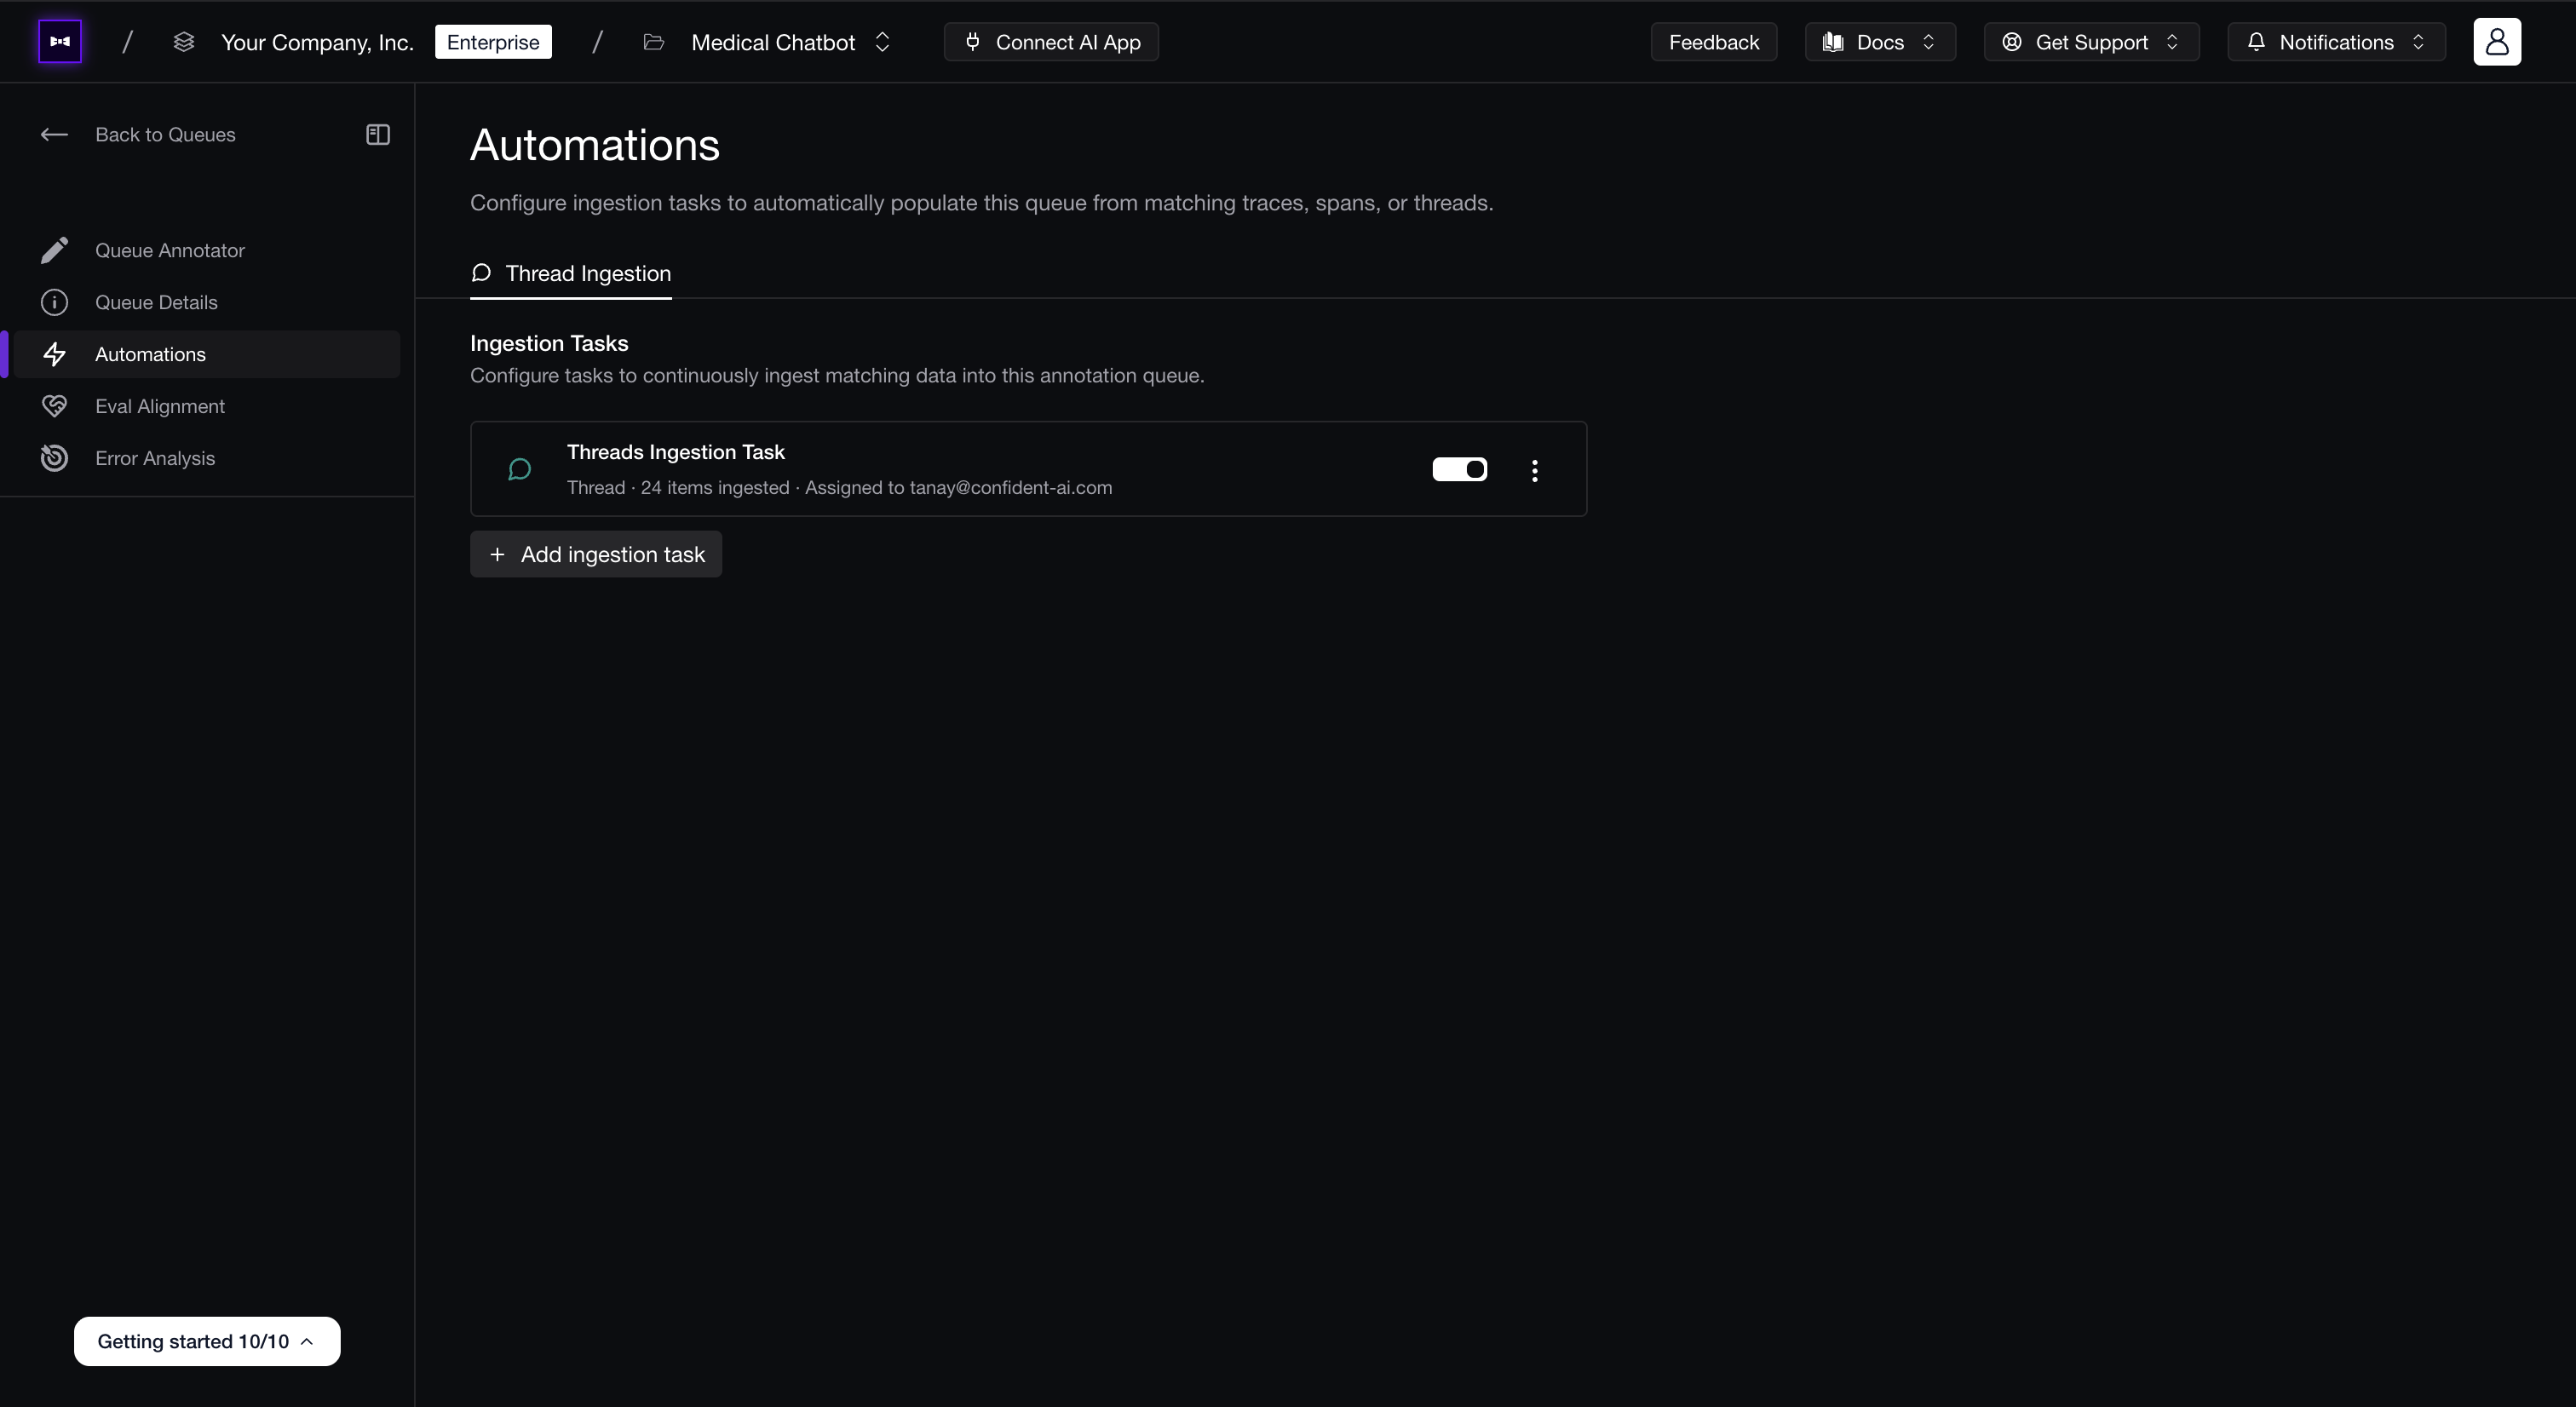
Open a queue and pick the Automations tab to manage its ingestion tasks. Each task targets the queue's data type — a trace queue ingests traces, a thread queue ingests threads, and so on.
Create an Ingestion Task
Open Automations
In the left side bar, navigate to Automations for an annotation queue and click Add ingestion task.
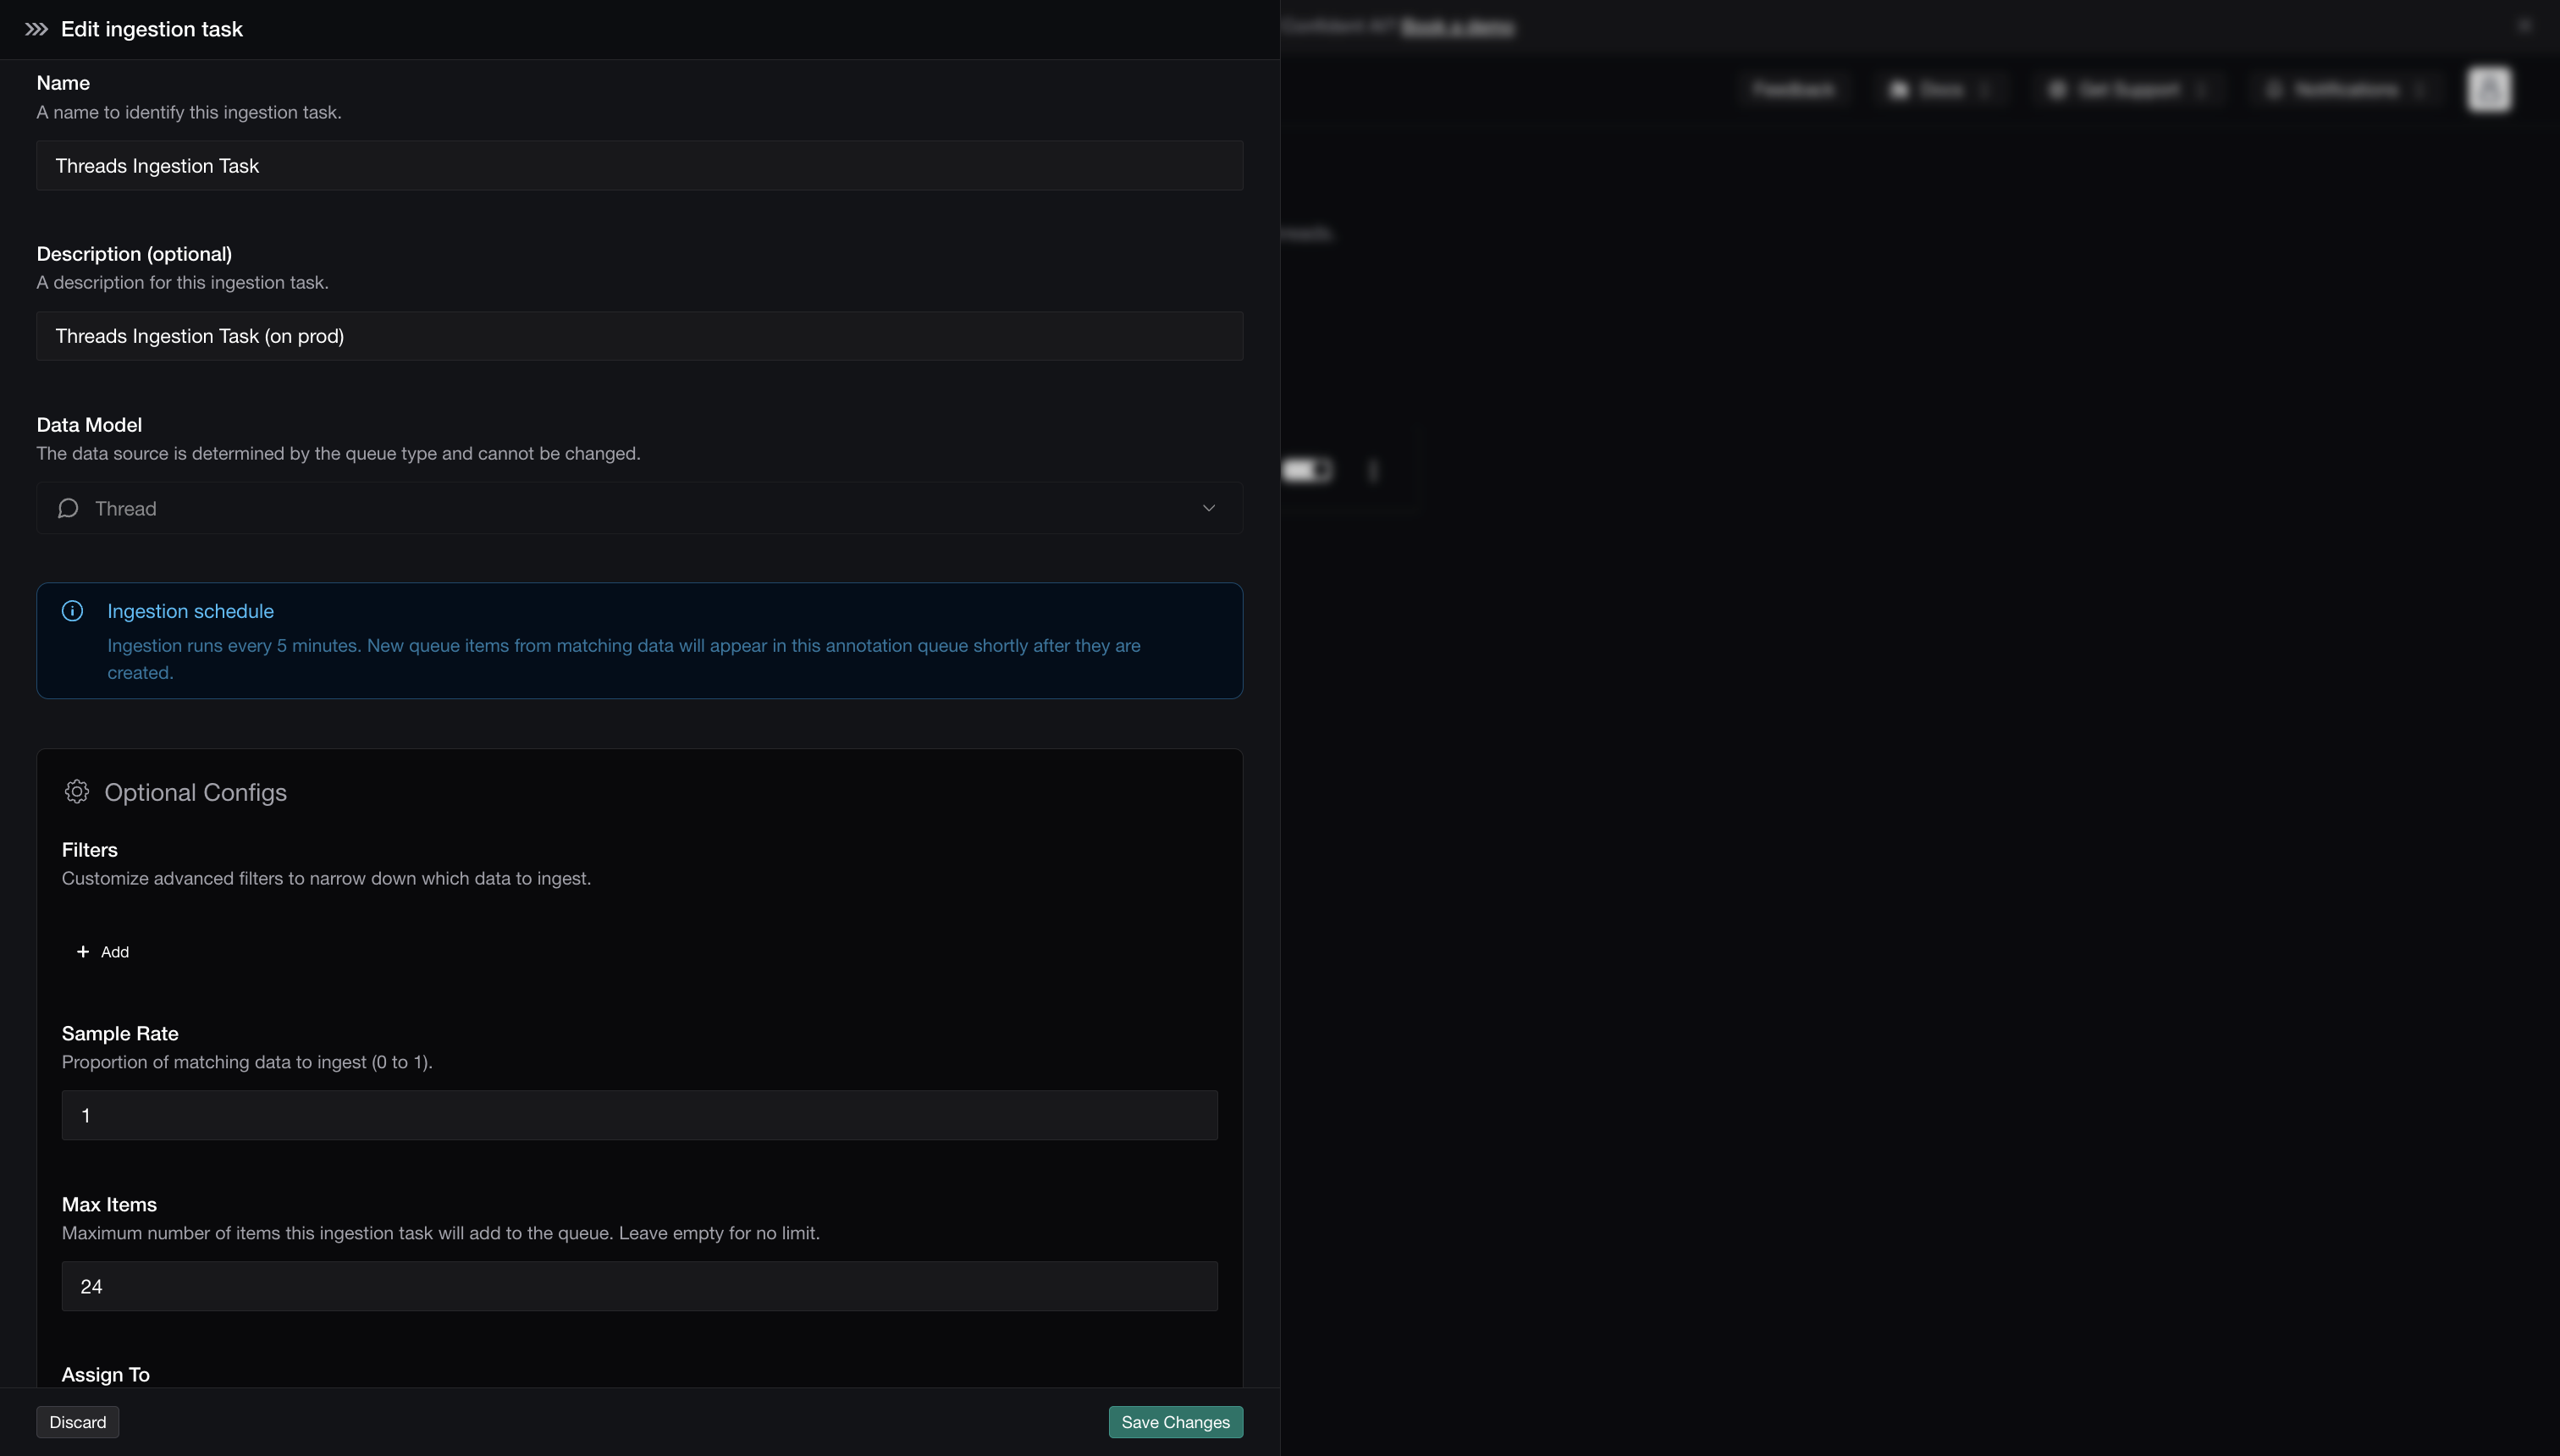
Name and describe
Pick a clear Name (e.g. Production billing complaints) and an optional Description. The data model is locked to the queue type — a thread queue ingests threads, a trace queue ingests traces.
Configure filters
Add Filters to narrow which items the task ingests. Filters use the same syntax as the Observatory and Dashboards, so you can match by environment, tag, metadata field, classifier label, score, latency, or any combination.
Tune sample rate and max items
Set the Sample Rate between
0and1to ingest only a fraction of matches (e.g.0.2ingests 20% of matching items). Optionally set Max Items to cap how many items the task can add to the queue total — leave blank for no limit.Pick an assignment strategy
Decide who each ingested item gets routed to. Pick one of:
- Unassigned — items land in the queue without an owner. Reviewers self-serve from the queue.
- Single user — every ingested item is assigned to the same project member.
- Round robin — rotates ingested items across a set of reviewers, weighted by fewest assignments first (with
lastAssignedAtas a tiebreaker). Even distribution is the goal — reviewers don't end up lopsided just because the task ran more often during their off-hours. - Random — picks one reviewer at random from a set for each ingested item. Useful when you want statistical coverage rather than even distribution.
Whichever strategy you pick, every assignee receives an in-app notification and an email summarizing how many items were routed to them. Notifications are batched per ingestion run, so a tick that assigns ten items to one reviewer fires one notification, not ten.
Save
Save the task. New items start arriving on the next ingestion tick — runs happen every five minutes.
Worked Examples
Single reviewer — a queue of low-feedback billing traces from production, with light sampling, that auto-routes to one reviewer:
| Field | Value |
|---|---|
| Name | Billing Quality — low feedback |
| Filters | tag = "billing" AND feedback.rating < 3 AND env = "prod" |
| Sample Rate | 0.2 |
| Max Items | 200 |
| Strategy | Single user |
| Assign To | reviewer@yourcompany.com |
Once enabled, the task ingests roughly one in five matching traces every five minutes (capped at 200 total) and assigns them to the named reviewer.
Round robin across a team — a queue of all production threads, distributed evenly across three on-call reviewers:
| Field | Value |
|---|---|
| Name | Production threads — daily review |
| Filters | env = "prod" |
| Sample Rate | 1 |
| Max Items | (unset) |
| Strategy | Round robin |
| Reviewers | alice@…, bob@…, carol@… |
Each ingested thread goes to whichever of the three has the fewest assignments so far on this task. Each reviewer gets a single batched notification per tick listing how many items they picked up.
Disable any task with the inline switch when you're done — the queue and any already-ingested items are untouched.